Privacy Tool Spotlight: Home Assistant Assist

About a year ago we wrote about leaving the traditional "Smart Home" ecosystems in favor of "Home Assistant," the private, self-hosted solution. It's been a great transition for us for multiple reasons. To begin with, everything is managed locally, so there's no dependency on an internet connection or cloud services. There are no logs being kept and reviewed for whatever reason, such as lifelogging where daily routines are mapped out. But this goes well beyond controlling the lights or robot vacuum through a convenient web dashboard.
The real power is through voice control. Having the ability to manage your home through a smart speaker is tremendous. And in traditional smart home ecosystems that comes at a cost to privacy. Those smart speakers are always listening because they have to. They're waiting for the magic "wake word" to start triggering an action. On top of that, everything that is said to the speaker, from commands to questions and searches, is transcribed and logged. Attorney Rebecca Pirius covers this topic in depth in her post, "Can Alexa Be Used Against You in a Criminal Case?"
That's where Home Assistant Assist, their voice assistant pipeline, offers a significant option. While we were testing the FutureProofHomes Satellite1.1 Smart Speaker we realized we've never covered this subject to explain how the process works and why we appreciate the Home Assistant Assist local option. So, let's get into it.
Voice Assistant Pipeline Overview
It really is a special kind of magic when you use a voice assistant. You start with the trigger word, "Hey Jarvis" in our case, give it a command, and something happens. Or perhaps you ask for the forecast or want to know how old actor Kevin Bacon is (68 as of writing) and the speaker responds with the information. This is Jetsons-level magic, but in plain terms it's a "voice pipeline."
It sounds so official when we use the term pipeline, but it's just a way to describe an automated sequence of processing steps where the output of one stage becomes the input for the next. The pipeline is simply a series of steps that hand off work from one to the next. Voice pipelines usually follow this four-step process:
The 4-Stage Voice Architecture
1. Wake Word Detection (Always-On On-Device Processing)
- How it works: Tiny chips inside the speaker continuously run a small, specialized neural network (often called a wake-word engine, such as Picovoice Porcupine or open-source microWakeWord) entirely on a local circular memory buffer.
- Data Flow: Audio is captured in 1–2 second loops and immediately overwritten. The main processor and network connection stay asleep until the local model decides the probability score for the phrase (for example, "Hey Google" or "Hey Alexa") is high enough.
2. Speech-to-Text / Automatic Speech Recognition (STT/ASR)
- How it works: Once triggered, the full audio stream is passed to an ASR (Automatic Speech Recognition) model that converts the sound waves into raw text.
- Cloud Approach: Audio streams over HTTPS to cloud servers, where large, powerful models turn speech into text while handling background noise, different accents, and complex vocabulary.
3. Intent Recognition & Natural Language Understanding (NLU)
- How it works: The raw text is passed to an NLU engine that figures out two key pieces: the Intent (what action to perform) and the Entities (the targets or details of that action).
- Example: "Turn off the kitchen lights" becomes Intent:
turn_off| Entities:domain: light,area: kitchen. - Traditional Approach: Uses simple rules or pattern matching. It maps phrases like "Turn off lights" straight to the home automation system.
4. Action Execution & Text-to-Speech (TTS)
- Action: The system sends a standard command to the targeted device or service (for example, a Zigbee, Z-Wave, or Matter command to turn off a light switch, or a query to a weather service).
- Text Generation: A short confirmation is created (for example, "Turned off the kitchen lights").
- TTS Synthesis: A TTS model turns that response text into an audio file (usually PCM or MP3).
- Playback: The audio is sent back to the speaker for immediate playback.
So, you start the process by saying the wake word, give the command, the system figures out the intent (command or question), takes action if needed or prepares a reply, then turns that reply into spoken words. It's a simple and repeatable four-step process that still feels magical to us.
Home Assistant Voice Assist
Unlike traditional smart home assistants, Home Assistant focuses on a flexible pipeline that can be as private as you want it to be. Setting up voice assist requires three choices. Here's how the setup screen describes them:
- Conversation agent: The conversation agent is the brains of your assistant. It processes the incoming text commands.
- Speech-to-text: When you speak to your assistant, the speech-to-text engine turns your voice command into text.
- Text-to-speech: When the assistant replies, the text-to-speech engine turns the response text into audio.
The best part is that you control each of these options. If you mainly want to control devices in your home, the combination of Home Assistant and Home Assistant Cloud meets those needs while still offering better privacy than the big commercial systems. Change the conversation agent to something more capable (we're using our existing Ollama setup) and it becomes a real game changer. Let's look at the different combinations so you can see what the options feel like.
Home Assistant and Home Assistant Cloud
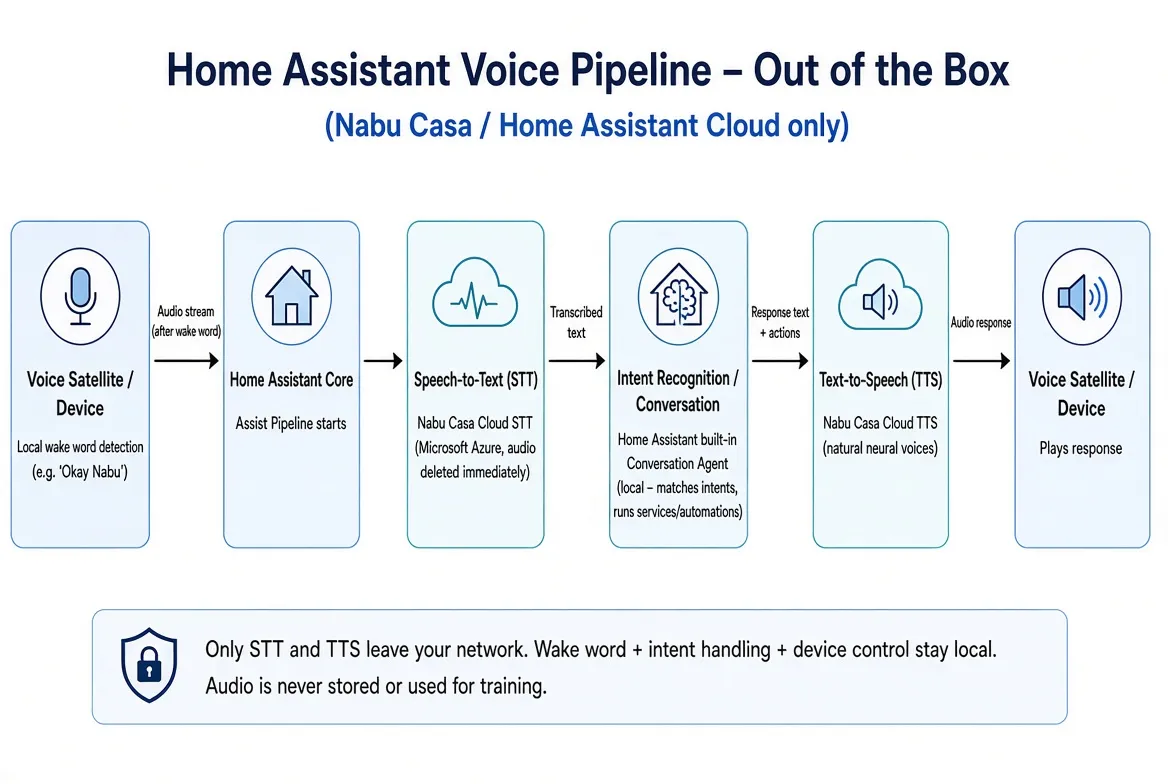
This is the best starting point if you're just dipping your toes into Voice Assist. It requires a subscription to cover the cloud services, but it works without any special technical expertise.
- Conversation agent: Home Assistant
- Speech-to-text: Home Assistant Cloud
- Text-to-speech: Home Assistant Cloud
This low-impact change brings several benefits beyond privacy:
1. Low Hardware Demands
Offloading speech-to-text (STT) and text-to-speech (TTS) to the cloud lets your local Home Assistant hardware (a Raspberry Pi or Home Assistant Green, for example) run smoothly without needing a powerful server or GPU.
2. Easy Setup
Turning on cloud voice takes a single click in the settings. It automatically builds the speech pipeline, so you skip the manual model downloads and tuning that self-hosted audio engines usually require.
3. Hybrid Local Command Execution
Spoken audio is converted to text in the cloud, but the actual understanding of the command and the control of your home stay local. The text comes back to your home network, and devices carry out the instructions right there.
4. Ephemeral Audio Privacy
Voice streams sent for speech processing are turned into text in real time and then immediately discarded. The audio is never stored on disk, never logged, and never used to build profiles about you.
5. Broader Language Support
The cloud voice engine supports a wider range of languages, dialects, and natural-sounding voices right out of the box than the lighter local models do.
Many people start here so they can learn how everything works. The usual next step is to switch the conversation agent to a model running locally on Ollama. That integration is both powerful and flexible. We're currently using the Google gemma4:26b model and have tried dozens of others with almost no disruption to our Home Assistant setup. Home Assistant can also connect to various cloud AI providers, but that would move us away from our privacy goals. If you want more capability than the built-in Home Assistant conversation agent, we recommend running Ollama locally. That would look like:
- Conversation agent: Ollama (local)
- Speech-to-text: Home Assistant Cloud
- Text-to-speech: Home Assistant Cloud
Going Fully Local with Wyoming
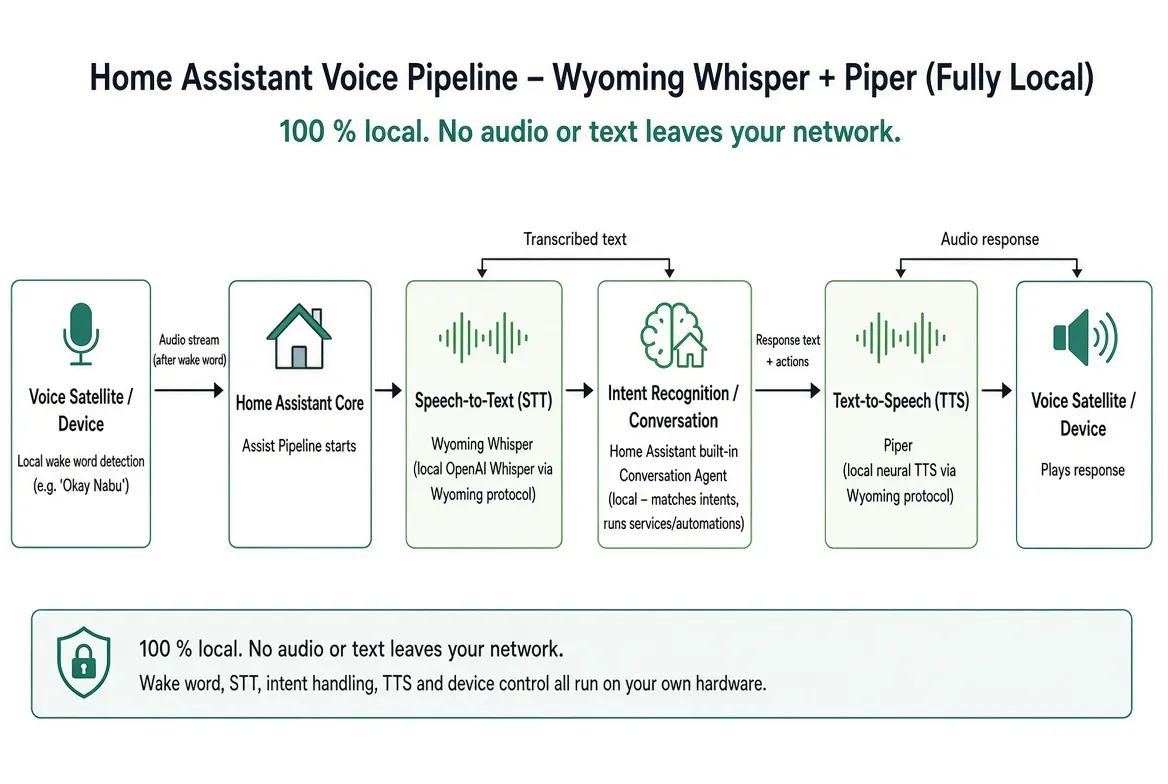
For many people, the mix of Ollama as the conversation agent and Home Assistant Cloud for the voice pieces works just fine. The transcription is accurate and the voices sound good. Some of us, though, prefer to keep everything local so there's zero dependence on the cloud. What follows is aimed at the hobbyist who already has a small home server, especially one set up with Docker. We're using a mini-PC for this. It started out hosting Ollama, and we quickly realized the underused machine could easily run several Docker containers, including ones from the Wyoming project for speech handling.
We're using the rhasspy/wyoming-whisper Docker image for speech-to-text. For text-to-speech, many people begin with the Wyoming Piper image (rhasspy/wyoming-piper). Docker makes it straightforward to spin up these two containers, and Home Assistant has a built-in integration that connects to both of them. The result is this fully local setup:
- Conversation agent: Ollama (local)
- Speech-to-text: Wyoming-Whisper (local)
- Text-to-speech: Wyoming-Piper (local)
This is a solid first all-local configuration. It lets you try the option with little extra cost beyond the hardware you already own. The Docker Compose file is pretty simple:
name: wyoming-voice

services:
  # ---------------------------------------------------------------------------
  # 1. Speech-to-Text (STT): Wyoming Whisper
  # ---------------------------------------------------------------------------
  wyoming-whisper:
    container_name: wyoming-whisper
    image: rhasspy/wyoming-whisper:latest
    restart: unless-stopped
    ports:
      - "10300:10300"
    volumes:
      - /home/${USER}/whisper-data:/data
    environment:
      - TZ=America/New_York
    devices:
      - /dev/dri:/dev/dri
      - /dev/kfd:/dev/kfd
    command: ["--model", "small-int8", "--language", "en", "--uri", "tcp://0.0.0.0:10300"]
    network_mode: host

  # ---------------------------------------------------------------------------
  # 2. Text-to-Speech Engine: Wyoming Piper
  # ---------------------------------------------------------------------------
  wyoming-piper:
    container_name: wyoming-piper
    image: rhasspy/wyoming-piper
    restart: unless-stopped
    ports:
      - "10200:10200"
    volumes:
      - /home/${USER}/piper-data:/data
    environment:
      - TZ=America/New_York
    command: ["--voice", "en_US-lessac-high", "--uri", "tcp://0.0.0.0:10200", "--length-scale", "1.2"]
    network_mode: host
A few of the settings are specific to our setup (the ports and the ${USER} directory path). We also used network_mode: host to keep things simple and avoid creating an extra Docker network. Almost everyone who tries this setup notes that it works, but the voices don't quite match what they're used to from commercial assistants. That's where Kokoro comes to the rescue.
Wyoming Kokoro
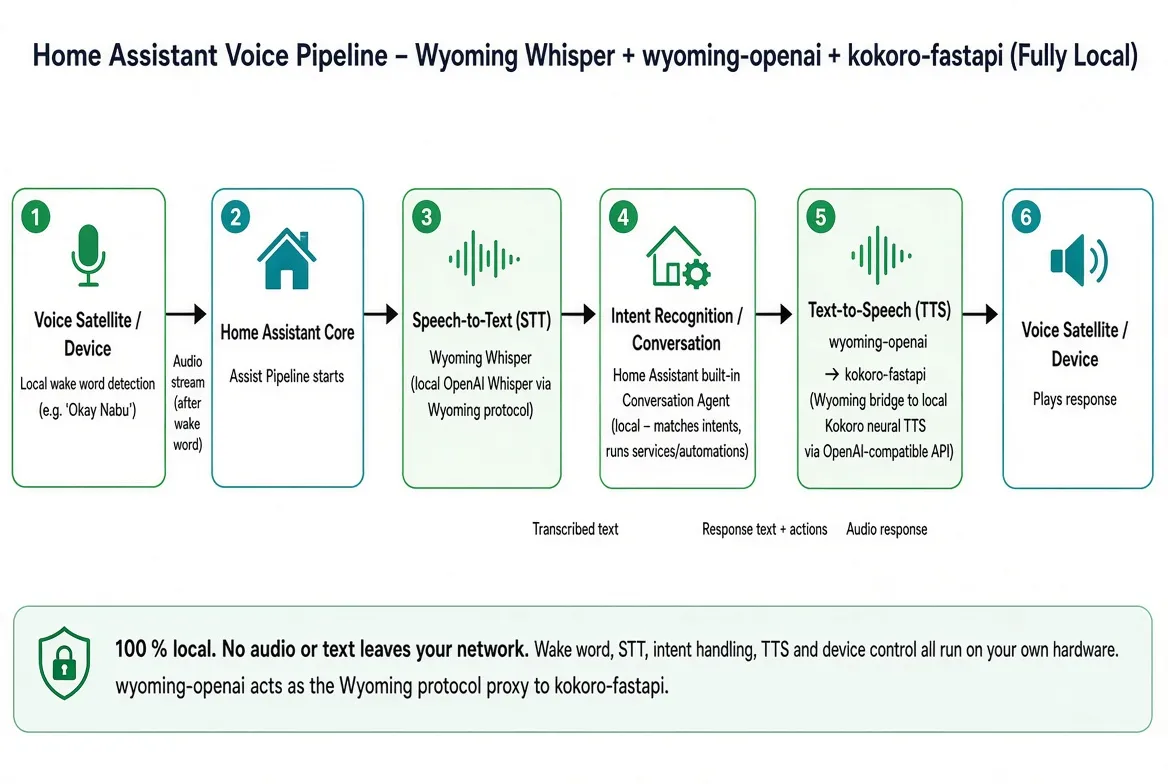
Kokoro (心) is a Japanese word that translates to "heart," but it also brings together the ideas of mind, spirit, and emotions into one whole. hexgrad chose the name because they wanted speech that feels emotionally resonant and human-like rather than robotic. And they seem to have hit the ball out of the park.
The Docker Compose file changes only slightly to swap Piper for Kokoro:
  kokoro-wyoming:
    container_name: wyoming-kokoro
    image: nordwestt/kokoro-wyoming:latest
    restart: unless-stopped
    ports:
      - "10200:10200"
    volumes:
      - /home/${USER}/kokoro-data:/data
    environment:
      - TZ=America/New_York
    command: ["--uri", "tcp://0.0.0.0:10200"]
    network_mode: host
The difference in voice quality is amazing. In Home Assistant you can pick one of the available voices and notice the improvement right away.
In our latest setup we switched to kokoro-fastapi plus wyoming-openai. This combination makes longer conversations smoother, especially when we ask more complex questions of Ollama. Our current Docker Compose file looks like this:
name: wyoming-voice

services:
  # ---------------------------------------------------------------------------
  # 1. Speech-to-Text (STT): Wyoming Whisper
  # ---------------------------------------------------------------------------
  wyoming-whisper:
    container_name: wyoming-whisper
    image: rhasspy/wyoming-whisper:latest
    restart: unless-stopped
    ports:
      - "10300:10300"
    volumes:
      - /home/${USER}/whisper-data:/data
    environment:
      - TZ=America/New_York
    devices:
      - /dev/dri:/dev/dri
      - /dev/kfd:/dev/kfd
    command: ["--model", "small-int8", "--language", "en", "--beam-size", "1", "--cpu-threads", "8", "--uri", "tcp://0.0.0.0:10300"]
    networks:
      - wyoming-net

  # ---------------------------------------------------------------------------
  # 2. Text-to-Speech Engine: Kokoro FastAPI
  # ---------------------------------------------------------------------------
  kokoro-fastapi:
    container_name: kokoro-fastapi
    image: ghcr.io/remsky/kokoro-fastapi-cpu:latest
    restart: unless-stopped
    environment:
      - TZ=America/New_York
      - DEVICE_TYPE=cpu
      - USE_GPU=false
      - API_LOG_LEVEL=WARNING
      - ONNX_NUM_THREADS=8
      - TORCH_NUM_THREADS=8
    networks:
      - wyoming-net

  # ---------------------------------------------------------------------------
  # 3. Streaming Adapter: Wyoming-OpenAI Proxy
  # ---------------------------------------------------------------------------
  wyoming-openai:
    container_name: wyoming-openai
    image: ghcr.io/roryeckel/wyoming_openai:latest
    restart: unless-stopped
    ports:
      - "10200:10200"
    environment:
      - TZ=America/New_York
      - WYOMING_URI=tcp://0.0.0.0:10200
      - TTS_OPENAI_URL=http://kokoro-fastapi:8880/v1
      - TTS_MODELS=kokoro
      - TTS_VOICES=am_puck af_heart am_michael bm_george bm_lewis
    depends_on:
      - kokoro-fastapi
    networks:
      - wyoming-net

networks:
  wyoming-net:
    external: true
    name: open-webui-net
This approach works well and sounds great, but it does add a little delay to the responses. If we had a supported graphics card the story might be different, and we may still end up going back to the simpler Wyoming-Piper setup for everyday use.
Wrap Up
Home Assistant goes a long way toward removing you from Big Tech solutions and giving you significant privacy. Home Assistant Assist lets you enjoy voice control again without giving up that privacy. There are many ways to configure it, from a simple cloud hybrid that gets you started in minutes to a fully local setup that keeps every bit of audio and processing on your own hardware. We've tried to outline some of the most practical options today so you can better understand how this magical technology works and choose the path that fits your comfort level and goals. Whether you stick with the easy cloud route or dive into Docker containers and local models, the power stays in your hands. That’s the real win: smart-home convenience that actually respects your privacy.
Remember: We may not have anything to hide, but everything to protect.