Home Assistant: Pt 2 - Your First Devices

You’ve got your Home Assistant server up and running, which is a big first step. But without devices, your smart home isn't very smart. Now it's time to add a few and see how Home Assistant brings them to life.
As we covered in the first part of this series, the list of Home Assistant Integrations is extensive, thanks to a dedicated community of developers. While the specific steps might vary, the general process for adding devices is similar across the board.
To show you a couple of different integration methods, we’ll be using a TP-Link Kasa Smart Plug and a SwitchBot Thermometer. Keep in mind that you'll need the official manufacturer apps to set up or update these devices. A good privacy practice is to use alias emails and strong, unique passwords for these accounts to keep your personal information separate.
Onboarding
During the initial setup of Home Assistant, you likely went through the "Onboarding Home Assistant" wizard. In the last step, it probably found some of your existing devices, and perhaps even a few of your neighbors’ devices. That really happened to us!
You can always choose to ignore an integration, as we did with our neighbor's smart lock, and focus on your own devices, like the Kasa Smart Plugs we already had.
Kasa Smart Plug
We really like the Kasa Smart Plug series for a few reasons. They are inexpensive and come in various models, including smart plugs, energy-monitoring plugs, and power strips with individual outlet control. Their compact size makes them perfect for hard-to-reach places like behind a couch or a Christmas tree. Most importantly, they don't require a separate hub since they connect directly to your Wi-Fi network.
This is especially useful if your router has a dedicated Internet of Things (IoT) network with device isolation and VPN support. This setup keeps all your IoT devices separate from your main network, adding a crucial layer of security. Once connected, these devices typically work without any fuss.
The TP-Link Kasa integration is a core part of Home Assistant and often works automatically. However, you must set up the device using the official Kasa app first.
- Set up the plug in the Kasa app: Use the official Kasa app on your phone or tablet to set up the smart plug and connect it to your Wi-Fi network. This ensures it's properly configured, has the firmware updated, and is on the same network as your Home Assistant server before you try to link it.
- Add the integration in Home Assistant:
- In Home Assistant, navigate to Settings > Devices & Services.
- Click the Add Integration button in the bottom right corner.
- Search for "TP-Link Smart Home" and select it from the list.
- Automatic Discovery: Home Assistant will likely discover your Kasa smart plug automatically. If it does, you'll see it listed as a "Discovered" device. Click Configure and follow the on-screen prompts to add it.
- Manual Setup (if needed): If your device isn't automatically discovered, you may need to manually enter your TP-Link cloud username (your email address) and password to link your account. We haven't run into this issue yet, but it is documented in this article: https://www.home-assistant.io/integrations/tplink/
Once the device is set up, it will automatically appear in your default dashboard. You'll also have the option to associate the device with a Floor and Room. Don't worry about getting this perfect right now, as you can easily update it later.
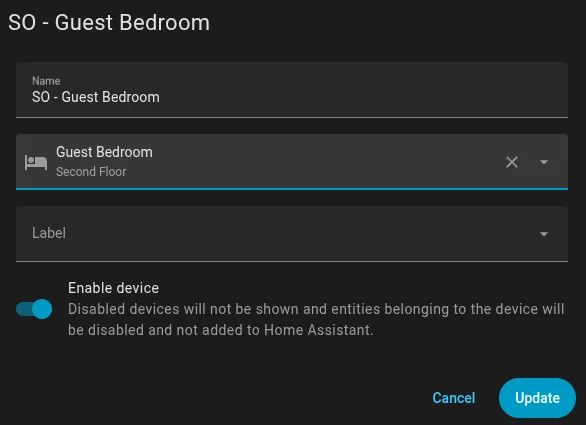
We suggest developing a simple naming strategy that will help you remember where everything is. In this example, we’ve named a device "SO - Guest Bedroom," which translates to "Switched Outlet, Guest Bedroom." This is easy to remember since it's the only device in the room. But in a room with several devices, or even a power strip or two, like the living room, you may need to be more creative. Just make your naming consistent—something like SO for individual outlets or PS for Power Strips, with outlets on the strip labeled PS Couch OU1, PS Couch OU2. A name like "HS103" when you have five of them gets confusing fast!
SwitchBot Thermometer Hygrometer via Bluetooth
For our next integration, let's connect via Bluetooth. We love the simple and inexpensive Thermometer Hygrometer combo from SwitchBot. They are another Home Assistant native integration with two options: Bluetooth and Matter. We'll start with the easiest integration method: Bluetooth.
This method connects the sensor directly to your Home Assistant server using Bluetooth, bypassing the need for a hub of any kind.
- Ensure Bluetooth is working: First, confirm that Bluetooth is enabled on your Raspberry Pi 4B and that Home Assistant's Bluetooth integration is active. Go to Settings > Devices & Services and look for the "Bluetooth" integration. If it's not there, add it. More detailed information is available at https://www.home-assistant.io/integrations/bluetooth/
- Add the SwitchBot integration:
- Go to Settings > Devices & Services.
- Click Add Integration.
- Search for and select "SwitchBot". Home Assistant will then begin scanning for nearby SwitchBot devices via Bluetooth.
- Discovery and Configuration: Once the thermometer is found, it will appear as a discovered device. Follow the on-screen instructions to finish the setup. You may need to provide your SwitchBot account credentials if the device uses encryption, which allows Home Assistant to retrieve the necessary keys.
With this integration, you may not even need the SwitchBot app, but it may be necessary to update the device's firmware.
This integration was incredibly simple for us. As soon as the device was activated by removing the protective battery strip, Home Assistant recognized it and suggested the integration. This may work well in a smaller setting, as the integrated Bluetooth on the Raspberry Pi 4 has a limited range. The further the device is moved away from the server, or the more interference encountered, the connectivity may become less reliable.
SwitchBot Thermometer Hygrometer via SwitchBot Hub 3 (Matter)
For a larger or more complex layout, you might want to consider using the SwitchBot Hub 3's Matter bridge. To be fully transparent, we upgraded to the Hub 3 for the number of sub-devices it could host on the Matter bridge. For this setup, you'll definitely need the SwitchBot App.
Using the SwitchBot Hub 3 provides a more stable, centralized connection via the Matter standard. It also offers stronger Bluetooth connectivity, easily allowing multiple devices to be hosted. SwitchBot offers mobile-specific setup instructions for iOS and Android. A summary of the process is as follows:
- Set up the Hub and Device: Use the official SwitchBot app on your phone to set up the SwitchBot Hub 3 and connect it to your Wi-Fi network. Make sure your SwitchBot thermometer is paired with the hub within the app.
- Enable Matter on the Hub: In the SwitchBot app, go into the settings for your Hub 3 and enable the Matter setup feature. This will generate a Matter pairing code or QR code that you will use to link it to Home Assistant.
- Add the Matter integration in Home Assistant:
- In Home Assistant, go to Settings > Devices & Services.
- Click Add Integration and select "Matter".
- Pair the Hub: Use the Matter pairing code or QR code from the SwitchBot app to link the hub to Home Assistant. After pairing, all the devices connected to the Hub 3 (including your thermometer) will be exposed to Home Assistant automatically. This method uses the hub as a bridge, which is especially useful if the Home Assistant server is too far away for a direct Bluetooth connection.
Home Assistant does offer more information about what Matter is and how to set it up at https://www.home-assistant.io/integrations/matter/
Matter can be a bit frustrating as it is an evolving standard. You will definitely want to ensure the firmware of all your devices is current and that everything is on the same network.
Wrap Up
Now that you've connected a couple of devices to your Home Assistant, you can start thinking about what combinations may work best for you. We find setting up an "Everything" switch in Home Assistant to be the most useful to turn everything off or on. But you may discover power-saving moves like turning off certain items when you're at work or asleep. You may want certain devices to turn on or set to a certain level when you plan to watch a movie. The choices are truly endless. Someone once joked that "you're spending several hours now to save seconds later", but it's the same with any home automation project or platform.
Next time, we'll set up a simple combination and dashboard to make it all work with the click of a switch. Until then, remember: we may not have anything to hide, but everything to protect.